$: cd /usr/lib/locale
$: sudo ln -s ca_ES.utf8 ca
$: sudo ln -s ca_ES.utf8 ca_ES
$: sudo bash
$: export LANGUAGE=ca_ES.UTF-8
$: export LANG=ca_ES.UTF-8
$: export LC_ALL=ca_ES.UTF-8
$: locale-gen ca_ES.UTF-8
$: dpkg-reconfigure locales
$: exit
(tancar la sessió i tornar a iniciar-la)

Es mostren els missatges amb l'etiqueta de comentaris GNU/Linux Ubuntu. Mostrar tots els missatges
Es mostren els missatges amb l'etiqueta de comentaris GNU/Linux Ubuntu. Mostrar tots els missatges
divendres, 1 d’abril del 2011


divendres, 30 d’abril del 2010
Gestor de restauració de particions amb Ubuntu
 En aquesta entrada s'explica com crear un un sistema gestor de còpies de seguretat (salvaguarda/restauració) de particions. Aquest gestor es carrega durant l'arranc d'Ubuntu en mode de restauració (kernel = ... ro single).
En aquest exemple es gestionen les còpies de seguretat de la partició "/dev/sda1" on es troba instal·lat Windows XP.
Instal·lar paquets necessaris:
| $ sudo apt-get install partimage parted |
Crear/Editar el fitxer de creació de còpies de seguretat:
| $ sudo nano /usr/share/recovery-mode/options/backup |
Contingut del fitxer:
#!/bin/sh

. /usr/share/recovery-mode/l10n.sh

if [ "$1" = "test" ]; then
  echo $(eval_gettext "Fer una còpia de seguretat de WindowsXP")
  exit 0
fi
PARTITION="/media/WindowsXP" DISP_PARTITION="/dev/sda1″ # La variable PARTITION conté la ruta de la partició on es troba Windows XP # La variable DISP_PARTITION conté el dispositiu de la partició on es troba Windows XP umount ${PARTITION} rm -f /root/WindowsXP.partimg.gz* partimage -z1 -o -f2 -d -b save ${DISP_PARTITION} /root/WindowsXP.partimg.gz # Paràmetres de partimage: # -z1: compress using gzip: fast and small image file (default) # -o: Overwrite the existing image file without confirmation # -f2: reboot (restart the computer) # -d: Don’t ask any description for the image file. # -b: batch mode: the GUI won't wait for an user action. exit 0 |
Ho desem, sortim i li donem permisos d'execució:
| $ sudo chmod +x /usr/share/recovery-mode/options/backup |
Crear/Editar el fitxer de restauració de còpies de seguretat:
| $ sudo nano /usr/share/recovery-mode/options/restore |
Contingut del fitxer:
#!/bin/sh

. /usr/share/recovery-mode/l10n.sh

if [ "$1" = "test" ]; then
  echo $(eval_gettext "Restaurar imatge de Windows XP")
  exit 0
fi
PARTITION="/media/WindowsXP" DISP_PARTITION="/dev/sda1″ # La variable PARTITION conté la ruta de la partició on es troba Windows XP # La variable DISP_PARTITION conté el dispositiu de la partició on es troba Windows XP umount ${PARTITION} partimage -b -f2 restore ${DISP_PARTITION} /root/WindowsXP.partimg.gz.000 # Paràmetres de partimage: # -b: batch mode: the GUI won't wait for an user action. # -f2: reboot (restart the computer) exit 0 |
Ho desem, sortim i li donem permisos d'execució:
| $ sudo chmod +x /usr/share/recovery-mode/options/restore |
Si voleu, també podeu limitar l'accés a les opcions del menú de restauració, per a fer-ho només heu de treure els permisos d'execució d'allò que vulgueu que no es mostri al menú, per exemple:
| $ cd /usr/share/recovery-mode/options sudo chmod -x clean |
També si voleu, podeu forçar reiniciar el sistema al sortir del menú de restauració, per a fer-ho editeu el fitxer :
| $ sudo nano /usr/share/recovery-mode/recovery-menu |
i substituïu tots els "exit 0" i "exit" per reboot. al final d'aquest fitxer també heu d'afegir un reboot:
#!/bin/bash

# include gettext stuff
. /usr/share/recovery-mode/l10n.sh

# main
menu_text=$(eval_gettext "Menú de restauració")

while true; do
  unset items

  items[c++]="sortir"
  items[c++]=$(eval_gettext "   Sortir del menú")

  for i in /usr/share/recovery-mode/options/*; do
    if [ -x "$i" ]; then
      name="`"$i" test`"
      if [ $? -eq 0 ]; then
        items[c++]="`basename "$i"`"
        items[c++]="   $name"
      fi
    fi
  done

  choice="$(/usr/bin/whiptail --menu "$menu_text" 15 70 6 \
                             "${items[@]}" \
                             3>&1 1>&2 2>&3 3>&-)"

  if [ $? -ne 0 ]; then
    reboot
  fi

  if [ "$choice" = "sortir" ]; then
    reboot
  fi

  "/usr/share/recovery-mode/options/$choice"

  if [ "$?" -eq 42 ]; then
    reboot
  fi
done
reboot
|
Referència: http://www.noticiasubuntu.com/
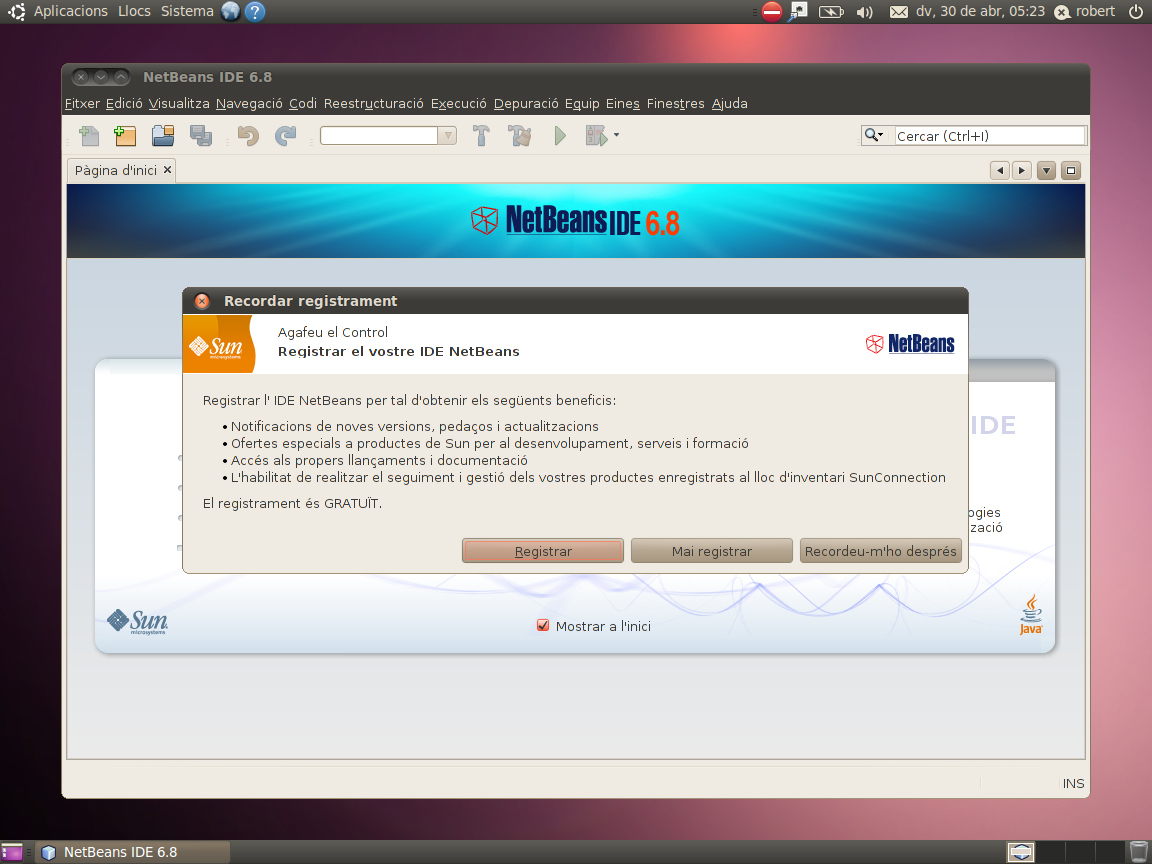
Nerbeans 6.8 amb català a Ubuntu 10.04
Ubuntu 10.04 LTS incorpora les traduccions de l'IDE Netbeans 6.8, d'aquesta manera podem disposar de NetBeans 6.8 amb català executant la comanda:
$ sudo apt-get install netbeans

$ sudo apt-get install netbeans
diumenge, 15 de novembre del 2009
Ubuntu: DNI-e a Firefox 3.5.5
Comprovació Maquinari (USB)
| $ lsusb ... Bus 002 Device 003: ID 058f:9520 Alcor Micro Corp. EMV Certified Smart Card Reader ... |
Instal·lar Programari
| sudo aptitude install libccid libpcsclite1 pcscd libopensc2 pinentry-gtk2 opensc mozilla-opensc pcsc-tools |
Descarregar debs de http://www.dnielectronico.es/descargas/PKCS11_para_Sistemas_Unix/opensc_1.4.6_arq.html
64 bits:
| tar xvf Ubuntu_Jaunty_opensc-dnie_1.4.6-2_amd64.deb.tar sudo dpkg -i libopensc2_0.11.7-7_amd64.deb opensc_0.11.7-7_amd64.deb opensc-dnie_1.4.6-2_amd64.deb |
32 bits:
| tar xvf Ubuntu_Jaunty_opensc-dnie_1.4.6-2_i386.deb.tar sudo dpkg -i libopensc2_0.11.7-7_i386.deb opensc_0.11.7-7_i386.deb opensc-dnie_1.4.6-2_i386.deb |
Comprovació Maquinari (Lector+DNI-e)
| $ pcsc_scan PC/SC device scanner V 1.4.15 (c) 2001-2009, Ludovic Rousseau Compiled with PC/SC lite version: 1.4.102 Scanning present readers... 0: Alcor Micro AU9520 00 00 Sun Nov 15 00:40:46 2009 Reader 0: Alcor Micro AU9520 00 00 Card state: Card inserted, Shared Mode, ATR: (eliminat números hexadecimals) ATR: (eliminat números hexadecimals) + TS = 3B --> Direct Convention + T0 = 7F, Y(1): 0111, K: 15 (historical bytes) TA(1) = 38 --> Fi=744, Di=12, 62 cycles/ETU 64516 bits/s at 4 MHz, fMax for Fi = 8 MHz => 129032 bits/s TB(1) = 00 --> VPP is not electrically connected TC(1) = 00 --> Extra guard time: 0 + Historical bytes: (eliminat números hexadecimals) Category indicator byte: 00 (compact TLV data object) Tag: 6, len: A (pre-issuing data) Data: (eliminat números hexadecimals) Mandatory status indicator (3 last bytes) LCS (life card cycle): 03 (Initialisation state) SW: 9000 (Normal processing.) Possibly identified card (using /usr/share/pcsc/smartcard_list.txt): (eliminat números hexadecimals) DNI electronico (Spanish electronic ID card) http://www.dnielectronico.es |
Configurar Firefox
Instal·lar certificat
Obrir la següent URL al Firefox:file:///usr/share/opensc-dnie/ac_raiz_dnie.crt
Establir contrasenya al Firefox
Edita -> Preferències -> Avançat -> Xifratge -> Dispositius de seguretat -> canvia la contrasenya(Establir contrasenya)
Habilitar FIPS
Edita -> Preferències -> Avançat -> Xifratge -> Dispositius de seguretat -> Habilita FIPSCarregar controladors
Edita -> Preferències -> Avançat -> Xifratge -> Dispositius de seguretat -> carrega/usr/lib/opensc/opensc-pkcs11.so
Seleccionar DNI-e
* Reiniciar firefox* Edita -> Preferències -> Avançat -> Xifratge -> Dispositius de seguretat -> Dispositius de seguretat
Seleccionar DNI electónico (PIN1)
Comprovació
* Edita -> Preferències -> Avançat -> Xifratge -> Dispositius de seguretat -> Visualitza els certificatsBloquejar actualitzacions
| $ sudo echo -e "opensc hold\nlibopensc2 hold" | sudo dpkg --set-selections |
dimarts, 22 de setembre del 2009
Ubuntu: Insta·lar GoogleEarth
 # aptitude install googleearth-package
# make-googleearth-package --force
# dpkg -i googleearth_5.1.3506.3999+0.5.6-1_i386.deb
# googleearth
dimecres, 10 de juny del 2009
Instal·lació Nagios
 Nagios és una eina per monotoritzar sistemes, aquí teniu una breu explicació de com instal·lar-ho extret de ghacks.net.
Are you one of those special geeks that think there is never TMI (too much information)? If that describes you then Nagios is the monitor for you. Once installed, Nagios will keep you busy with more information about your system than you ever thought possible. But it’s not just a matter of running apt-get install nagios. No, there’s more to the installation than that.
In this article you will see how to install Nagios on a working Ubuntu Server installation. The release I used was 9.04, but you should be able to use 8.04 just as easily.
Features
You want features? Nagios is full of them. Nagios can monitor your entire network, you can handle problem remediation, you can plan network downtime, you can watch hosts, systems, services, applications..there’s very little you can’t do with Nagios.
But let’s think about this installation. The best (and really only good) way to install Nagios is from source. This means you are going to have to do some compliation. Don’t worry, it’s not hard…when you have a step-by-step guide that is.
Before you start
If you are using, as I did, a Ubuntu server installation, you will need to install a few tools first. So from the command line (on your Ubuntu server) issue the following commands:
sudo apt-get install php5-gd
sudo apt-get install gcc
sudo apt-get install make
The above commands will install the tools you need in order to get Nagios installed. If you don’t install the above, you won’t be able to complete the installation.
Installing Nagios - preflight
Before you actually run the installation you will need to take care of some user/group accounting first.
Create the user nagios:
sudo useradd -m nagios
Give the nagios user a password:
sudo passwd nagios
NOTE: You will have to enter the new password twice for the above command.
Create the group nagios:
sudo groupadd nagios
Add the user nagios to the group nagios:
sudo usermod -G nagios nagios
Create the group nagcmd:
sudo groupadd nagcmd
Add the user nagios to the group nagcmd:
sudo usermod -a -G nagcmd nagios
Add the Apache user to the group nagcmd:
sudo usermod -a -G nagcmd www-data
Installing Nagios and Nagios Plugins
The first thing to do is to download the files you need. Issue the commands:
wget http://osdn.dl.sourceforge.net/sourceforge/nagios/nagios-3.0.6.tar.gz
and
wget http://osdn.dl.sourceforge.net/sourceforge/nagiosplug/nagios-
plugins-1.4.11.tar.gz
to download the files you need.
Untar the Nagios file with:
tar xvzf nagios-3.0.6.tar.gz
Change into the newly created Nagios directory with the command:
cd nagios-3.0.6
Now run the configure script using the nagcmd defined as the command group with the command:
sudo ./configure –with-command-group=nagcmd
Time to compile:
sudo make all
Time to install everything:
make install
make install-init
make install-config
make install-commandmode
Almost ready to finalize the installation of Nagios (before moving on to installing the plugins.) There is one simple configuration to take care of (for the basic installation). Open up the /usr/local/nagios/etc/objects/contacts.cfg file and add your email address as the contact email address. That’s the only configuration to change for now.
Configuring for the Web interface
There are just a few commands to run to configure the Web interface:
make install-webconf
htpasswd -c /usr/local/nagios/etc/htpasswd.users nagiosadmin
/etc/init.d/apache2 reload
The final command above simply restarts Apache.
Install the plugins
Before you log into your Nagios installation you have to install your plugins first. Change to the directory you downloaded the Nagios files to and untar the plugins file:
tar xvzf nagios-plugins-1.4.11.tar.gz
Now change into the newly created directory:
cd nagios-plugins-1.4.11
Compile the plugins with the command:
sudo ./configure –with-nagios-user=nagios –with-nagios-group=nagios
Now install the plugins with the following commands:
make
make install
Fire it up!
Of course you want to make sure Nagios starts any time the system is restarted. Do this with the command:
sudo ln -s /etc/init.d/nagios /etc/rcS.d/S99nagios
And finally, before you start up Nagios, make sure there are no errors with the command:
sudo /usr/local/nagios/bin/nagios -v /usr/local/nagios/etc/nagios.cfg
If you see no errors reported, it’s time to start it up. Issue the command:
sudo /etc/init.d/nagios start
Nagios is ready to go. Point your browser to:
http://ADDRESS_OF_NAGIOS_SERVER/nagios
You should be ready to enjoy all that is Nagios. Congratulations.
divendres, 17 d’abril del 2009
Ubuntu i Kubuntu amb CD
 | Ja es pot demanar el CD per Ubuntu i Kubuntu de la versió 9.04 perque t'arribi a casa. Només us heu de donar d'alta i us arribarà en uns 15 dies. Cal dir també que a partir del proper 23 d'abril ja es podrà descarregar a través de la web. |
Ubuntu Ship-It
Kubuntu Ship-It
Mentres si teniu pressa per veure com funciona us podeu descarregar la Ubuntu 9.04 Release Candidate
divendres, 6 de març del 2009
Ubuntu: Instal·lació des de Windows
| Com instal·lar GNU/Linux Ubuntu des de Microsoft Windows. |

Passos a seguir:
- Triar la unitat on s'instal·larà Ubuntu
- Mida en GB de la instal·lació
- Entorn d'escriptori: (Ubuntu (gnome), Kubuntu (KDE), XUbuntu (XFCE), ...)
- Triar el idioma
- Introduir un usuari (nom+contrasenya)
- Clicar Instal·la
Podeu observar/col·laborar en la traducció de WUBI al català a la pàgina web https://translations.launchpad.net/wubi, Abans de fer-ho llegiu-vos:
diumenge, 1 de març del 2009
Crear un LiveUSB de GNU/Linux
| En aquest post s'explica com crear un Live USB de GNU Linux. Aquest Live USB pot contindre els arxius d'instal·lació d'una distribució GNU/Linux, o bé un sistema Live CD que permet arrancar el sistema operatiu directament des del USB, sense necessitat d'instal·lar-lo al disc dur. |
Instal·lar paquets necessaris
| Archlinux | $ pacman -S unetbootin |
| Debian | $ sudo aptitude install unetbootin |
| Fedora | $ yum install unetbootin |
| Opensuse | $ yast -i unetbootin |
| Ubuntu | $ sudo aptitude install unetbootin |
| Windows | Instal·lar Unetbootin |
Instal·lació sense imatge de CD
Pasos a seguir (requereix entorn gràfic):
- Introduïr el llàpiç USB
- Iniciar unetbootin
- Seleccionar la distribució GNU/Linux
- Seleccionar la versió
- Seleccionar el llàpiç
- Iniciar la instal·lació
Instal·lació amb imatge (iso) de CD
Pasos a seguir (requereix entorn gràfic i una imatge d'un CD):
- Introduïr el llàpiç USB
- Iniciar unetbootin
- Seleccionar la imatge de disc
- Seleccionar el llàpiç
- Iniciar la instal·lació
Podeu obtindre més informació de http://unetbootin.sourceforge.net/
dissabte, 28 de febrer del 2009
Còpies de seguretat en un LiveCD
| En aquest post s'explica com crear còpes de seguretat de la vostra instal·lació de GNU/Linux Ubuntu en format LiveCD, es a dir autoarrancable. |
Instal·lar paquests necessaris:
$ sudo echo -ne '\n# Remastersys\ndeb http://www.remastersys.klikit-linux.com/repository remastersys/\n' > /etc/apt/sources.list.d/Remastersys
$ sudo apt-get update
$ sudo aptitude install remastersys
Per fer una còpia de seguretat de tot el sistema:
$ sudo remastersys backup backup.iso
Per fer una còpia de seguretat de tot el sistema exeptuant els directoris personals:
$ sudo remastersys dist live.iso
Mes informació a http://www.remastersys.klikit-linux.com/ubuntu.html
Crear un LiveUSB de Debian
 En aquest post s'explica com crear un LiveUSB basat en GNU Linux Debian 5.0 (Lenny).
Requeriments:
- El paquet més recent de live-helper
- Consola compatible amb posix, com bash o dash.
- linux-2.6
- cdebootstrap o debootstrap
Instal·lar paquets necessaris
$ sudo aptitude install live-helper
Preparar un directori arrel
$ mkdir debian-live
$ cd debian-live
$ su
Crear la imatge
Exemples de creació d'imatges
Per crear una imatge bàsica amb els paràmetres per defecte:
$ lh_config -b usb-hdd && lh_build
Per generar una imatge amb el mínim:
$ lh_config -b iso -p minimal && lh_build
Per generar una imatge amb l'escriptori KDE:
$ lh_config -b usb-hdd -p kde-desktop && lh_build
Per generar una imatge amb l'escriptori GNOME:
$ lh_config -b usb-hdd -p gnome-desktop && lh_build
Per generar una imatge amb l'escriptori XFCE:
$ lh_config -b usb-hdd -p xfce-desktop && lh_build
Per crear una una imatge especificant una arquitectura:
$ lh_config -b usb-hdd -a i386 && lh_build
$ lh_config -b usb-hdd -a amd64 && lh_build
Per crear una una imatge especificant una distribució:
$ lh_config -b usb-hdd -d lenny && lh_build
$ lh_config -b usb-hdd -d sid && lh_build
Creant la imatge (Exemple avançat)
Es recomana tindre 10GB lliures per tal de crear la imatge Live.
El resultat s'enmagatzemara a binary.iso
| lh_config -b usb-hdd -d lenny -a i386 \ --bootloader grub \ --debian-installer live \ --memtest memtest86+ \ --bootappend-live "locale=ca_ES.UTF-8 keyb=es autologin" \ --categories "main contrib non-free" \ -p gnome-desktop \ --packages "dhcp3-client tar gzip zip unzip bzip2 smbfs sshfs libfuse2 ntfs-3g nano openssh-client openssh-server smbclient partimage gparted tcpdump wireshark xpdf gimp gimp-data gimp-data-extras openjdk-6-jre openoffice.org openoffice.org-l10n-ca iceweasel-l10n-ca aspell-ca myspell-ca wcatalan" lh_bootstrap && lh_chroot wget http://fpdownload.macromedia.com/get/flashplayer/current/install_flash_player_10_linux.tar.gz && tar xvf install_flash_player_10_linux.tar.gz cp install_flash_player_10_linux/libflashplayer.so chroot/usr/lib/iceweasel/ chroot chroot chmod 755 /usr/lib/iceweasel/libflashplayer.so cp install_flash_player_10_linux/libflashplayer.so chroot/usr/lib/iceweasel/plugins chroot chroot chmod 755 /usr/lib/iceweasel/plugins/libflashplayer.so rm -fr install_flash* lh_binary |
Per provar la imatge:
$ aptitude install qemu
$ qemu -hda binary.img
Grabar la imatge al llapiç USB
$ dd if=binary.img of=/dev/sdx
on /dev/sdx es on es troba el llapiç.
$ sync
Modificar chroot i tornar a generar la imatge
$ lh_clean --binary
Realitzar canvis al directori chroot... i per a tornar a fer la imatge:
$ lh_binary_iso --force
Modificar paquets i tornar a generar la imatge
$ lh_clean --binary --chroot
Realitzar canvis... i per a tornar a fer la imatge:
$ lh_build
Podeu obtindre més informació de http://wiki.debian.org/DebianLive
Crear un LiveCD de Debian
En aquest post s'explica com crear un LiveCD basat en GNU Linux Debian 5.0 (Lenny).Requeriments:
- El paquet més recent de live-helper
- Consola compatible amb posix, com bash o dash.
- linux-2.6
- cdebootstrap o debootstrap
Instal·lar paquets necessaris
$ sudo aptitude install live-helper
Preparar un directori arrel
$ mkdir debian-live
$ cd debian-live
$ su
Crear la imatge
Exemples de creació d'imatges
Per crear una imatge bàsica amb els paràmetres per defecte:
$ lh_config -b iso && lh_build
Per generar una imatge amb el mínim:
$ lh_config -b iso -p minimal && lh_build
Per generar una imatge amb l'escriptori KDE:
$ lh_config -b iso -p kde-desktop && lh_build
Per generar una imatge amb l'escriptori GNOME:
$ lh_config -b iso -p gnome-desktop && lh_build
Per generar una imatge amb l'escriptori XFCE:
$ lh_config -b iso -p xfce-desktop && lh_build
Per crear una una imatge especificant una arquitectura:
$ lh_config -b iso -a i386 && lh_build
$ lh_config -b iso -a amd64 && lh_build
més informació: $ man lh_config
Per crear una una imatge especificant una distribució:
$ lh_config -b iso -d lenny && lh_build
$ lh_config -b iso -d sid && lh_build
més informació: $ man lh_config
Per crear una una imatge que permeti la instal·lació al disc:
$ lh_config -b iso --debian-installer live && lh_build
$ lh_config -b iso --debian-installer netinst && lh_build
$ lh_config -b iso --debian-installer cdrom && lh_build
$ lh_config -b iso --debian-installer netboot && lh_build
més informació: $ man lh_config
Creant la imatge (Exemple avançat)
Es recomana tindre 10GB lliures per tal de crear la imatge Live.
El resultat s'enmagatzemara a binary.iso
| lh_config -b iso -d lenny -a i386 \ --bootloader grub \ --debian-installer live \ --iso-preparer "Sistemes operatius per a tothom" \ --iso-publisher "Sistemes operatius per a tothom; http://sistemesoperatiuspertothom.blogspot.com" \ --iso-volume "Debian Live Lenny" \ --memtest memtest86+ \ --bootappend-live "locale=ca_ES.UTF-8 keyb=es autologin" \ --hostname debianlive \ --username usuarilive \ --categories "main contrib non-free" \ -p gnome-desktop \ --packages "dhcp3-client tar gzip zip unzip bzip2 smbfs sshfs libfuse2 ntfs-3g nano openssh-client openssh-server smbclient partimage gparted tcpdump wireshark xpdf gimp gimp-data gimp-data-extras openjdk-6-jre openoffice.org openoffice.org-l10n-ca iceweasel-l10n-ca aspell-ca myspell-ca wcatalan usplash usplash-theme-debian" lh_bootstrap && lh_chroot wget http://fpdownload.macromedia.com/get/flashplayer/current/install_flash_pla$ cp install_flash_player_10_linux/libflashplayer.so chroot/usr/lib/iceweasel/ chroot chroot chmod 755 /usr/lib/iceweasel/libflashplayer.so cp install_flash_player_10_linux/libflashplayer.so chroot/usr/lib/iceweasel/plu$ chroot chroot chmod 755 /usr/lib/iceweasel/plugins/libflashplayer.so rm -fr install_flash* lh_binary |
Per provar la imatge:
$ aptitude install qemu
$ qemu -cdrom binary.iso
Modificar chroot i tornar a generar la imatge
$ lh_clean --binary
Realitzar canvis al directori chroot... i per a tornar a fer la imatge:
$ lh_binary_iso --force
Modificar paquets i tornar a generar la imatge
$ lh_clean --binary --chroot
Realitzar canvis... i per a tornar a fer la imatge:
$ lh_build
Podeu obtindre més informació de http://wiki.debian.org/DebianLive
dissabte, 31 de gener del 2009
Google Gadgets Linux


GNU/Linux Archlinux
Instal·lació
wget http://google-gadgets-for-linux.googlecode.com/files/google-gadgets-for-linux-0.10.5.tar.bz2
tar xvf google-gadgets-for-linux-0.10.5.tar.bz2
cd google-gadgets-for-linux*
./configure
make
make install
Per iniciar-lo:
GNOME: /usr/local/bin/ggl-gtk
KDE: /usr/local/bin/ggl-qt
GNU/Linux Fedora
Instal·lació
GNOME: yum install google-gadgets-gtk
KDE: yum install google-gadgets-qt
Per iniciar-lo:
GNOME: ggl-gtk
KDE: ggl-qt
GNU/Linux Mandriva
Instal·lació
urpmi google-gadgets
(repositori contrib)
Per iniciar-lo:
GNOME: ggl-gtk
KDE: ggl-qt
GNU/Linux Ubuntu
Instal·lació
sudo apt-get install build-essential zip flex desktop-file-utils shared-mime-info zlib1g-dev libgtk2.0-dev libxml2-dev libdbus-1-dev librsvg2-dev libltdl3-dev libcurl4-gnutls-dev libgstreamer-plugins-base0.10-dev xulrunner-1.9-dev network-manager-dev libqt4-dev libstartup-notification0-dev
wget http://google-gadgets-for-linux.googlecode.com/files/google-gadgets-for-linux-0.10.5.tar.bz2
tar xvf google-gadgets-for-linux-0.10.5.tar.bz2
cd google-gadgets-for-linux*
./configure
make
make install
Per iniciar-lo:
/usr/local/bin/ggl-gtk
GNOME: /usr/local/bin/ggl-gtk
KDE: /usr/local/bin/ggl-qt
dilluns, 26 de gener del 2009
IBM Lotus Symphony 1.2 i 1.2.1 (Leopard)
 IBM Lotus Symphony està disponible per a descàrrega gratuïta. La suite d'aplicacions d'IBM inclou un processador de texts, un full de càlculs, i un programa de presentacions. Lotus Symphony utilitza el format ODF, encara que també és compatible amb DOC, XLS i PPT, i és capaç d'exportar a PDF. Aquesta suite està basada en openoffice.
Es pot descarregar de: http://symphony.lotus.com/
Plataformes:
- Windows
- Windows XP - versió 1.2 (3-11-2008)
- Windows Vista - versió 1.2 (3-11-2008)
- Linux
- Suse Linux Enterprise Desktop 10 - versió 1.2 (3-11-2008)
- Redhat Enterprise Linux 5 - versió 1.2 (3-11-2008)
- Ubuntu 8.0.4 LTS - versió 1.2 (3-11-2008)
- MacOS
- MacOS X 10.5 (Intel) - versió 1.2.1 (14-01-2009)
- Català
- Xinès Simplificat
- Xinès Tradicional
- Francès
- Alemany
- Italià
- Japonés
- Koreà
- Portuguès
- Brassileny
- Castellà
$ sudo apt-get install libstdc++6
$ sudo dpkg -i symphony-nl1_1.2-1hardy1_i386.deb
Instal·lació Suse Linux Enterprise Desktop 10
$ sudo rpm -i symphony-1.2.i586.rpm --nodeps
$ sudo rpm -i symphony-nl1-1.2.i586.rpm --nodeps
Instal·lació Redhat Enterprise Linux 5
$ sudo rpm -i symphony-1.2.i586.rpm --nodeps
$ sudo rpm -i symphony-nl1-1.2.i586.rpm --nodeps
Instal·lació MacOS Leopard
Doble clic a IBM_Lotus_Symphony_nl1.dmg
Clic IBM Lotus Symphony.mpkg
dimecres, 21 de gener del 2009
Debian: Internet explorer 5, 5.5, 6
| Com instal·lar internet explorer a sistemes operatius basats en GNU/Linux Debian (Debian, Ubuntu, ...). |
$ sudo apt-get install wine cabextract
$ wget http://www.tatanka.com.br/ies4linux/downloads/ies4linux-latest.tar.gz
$ tar zxvf ies4linux-latest.tar.gz
$ cd ies4linux-*
$ sudo ./ies4linux
Si us dona problemes la instal·lació gràfica, executeu:
$ ./ies4linux --no-gui


Ubuntu (8.04 - 9.04): Últim KDE
| En aquest post descriu com actualitzar el gestor d'escriproris KDE, a 4.2, de l'Ubuntu. |
Executar la següent comanda:
$ sudo aptitude --purge remove koffice-data-kde4
Editar l'arxiu /etc/apt/sources.list
sudo nano /etc/apt/sources.list
Depenent de la versió Instal·lada d'Ubuntu afegir les següents linies:
| Hardy Heron 8.04 |
| deb http://ppa.launchpad.net/kubuntu-experimental/ubuntu hardy main |
| Intrepid Ibex 8.10 |
| deb http://ppa.launchpad.net/kubuntu-experimental/ubuntu intrepid main |
| Jaunty Jackalope 9.04 |
| deb http://ppa.launchpad.net/kubuntu-experimental/ubuntu jaunty main |
Executar les següents ordres:
$ sudo aptitude update
$ sudo aptitude safe-upgrade
Ubuntu (8.04, 8.10): Última versió wine
| En aquest post us ensenyarem a actualitzar a la última versió el vostre wine, plataforma emuladora de windows. |
Executar la instrucció:
$ wget -q http://wine.budgetdedicated.com/apt/387EE263.gpg -O- | sudo apt-key add -
Depenent de la versió Instal·lada d'ubuntu executar la següent ordre:
| Hardy Heron 8.04 |
| sudo wget http://wine.budgetdedicated.com/apt/sources.list.d/hardy.list -O /etc/apt/sources.list.d/winehq.list |
| Intrepid Ibex 8.10 |
| sudo wget http://wine.budgetdedicated.com/apt/sources.list.d/intrepid.list -O /etc/apt/sources.list.d/winehq.list |
Executar les següents ordres:
$ sudo apt-get update
$ sudo apt-get install wine
Ubuntu (8.04 - 9.04): Última versió firefox
| En aquest post us ensenyarem a actualitzar al últim navegador firefox. |
Editar l'arxiu /etc/apt/sources.list
$ sudo nano /etc/apt/sources.list
Depenent de la versió Instal·lada d'Ubuntu afegir les següents linies:
| Hardy Heron 8.04 |
| deb http://ppa.launchpad.net/mozillateam/ubuntu hardy main |
| Intrepid Ibex 8.10 |
| deb http://ppa.launchpad.net/mozillateam/ubuntu intrepid main |
| Jaunty Jackalope 9.04 |
| deb http://ppa.launchpad.net/mozillateam/ubuntu jaunty main |
Executar les següents ordres:
$ sudo apt-get update
$ sudo apt-get dist-upgrade
Ubuntu (8.04 - 9.04): Última versió OpenOffice
| En aquest post us ensenyarem a instal·lar i/o actualitzar l'OpenOffice a la última versió (3.0.1). |
Editar l'arxiu /etc/apt/sources.list
$ sudo nano /etc/apt/sources.list
Depenent de la versió Instal·lada d'Ubuntu afegir les següents linies:
| Hardy Heron 8.04 |
| deb http://ppa.launchpad.net/openoffice-pkgs/ubuntu hardy main deb-src http://ppa.launchpad.net/openoffice-pkgs/ubuntu hardy main |
| Intrepid Ibex 8.10 |
| deb http://ppa.launchpad.net/openoffice-pkgs/ubuntu intrepid main deb-src http://ppa.launchpad.net/openoffice-pkgs/ubuntu intrepid main |
| Jaunty Jackalope 9.04 |
| deb http://ppa.launchpad.net/openoffice-pkgs/ubuntu jaunty main deb-src http://ppa.launchpad.net/openoffice-pkgs/ubuntu jaunty main |
Executar les següents ordres:
$ sudo apt-get update
$ sudo apt-get dist-upgrade
$ sudo aptitude install openoffice
dimecres, 12 de novembre del 2008
Subscriure's a:
Missatges (Atom)

Sign by Danasoft - Myspace Layouts and Signs